Monday, April 30, 2018

MtS Sketch 226

My daughter has been asking me several weeks to make her a rainbow and unicorn card so I was inspired to use them both for this week's MtS Sketch 226.

http://matchthesketch.blogspot.be/2018/04/mts-sketch-226.html

Rainbow unicorn card

First I blended 5 distress colors with a blending foam to create a rainbow background.
Then I stamped the unicorn from Clearly Besotted with Memento Tuxedo Black and colored it with Chameleon markers. I also added a glitter effect onto the unicorn with the Wink of Stella but you can't see it clearly on the picture.

Next I die cut a circle out of the rainbow background and used a bigger white circle to add behind this.
The sentiment is from Lawn Fawn - Starry Backdrops.
Finally I used foam squares to adhere the stitched star, sentiment strip and unicorn to give them some dimension. 

 
Rainbow unicorn card

Supplies
- Distress Oxide ink:
          - Candied apple
          - Fossilized amber
          - Twisted citron
          - Broken china
          - Wilted violet
- Stitched circle die
- Clearly besotted - Fairy tale unicorns
- Memento Tuxedo Black
- Chameleon markers: RD4, Y02, BL6 and PR4
- Lawn Fawn - Starry backdrops
- Stitched star die
- Versafine Onyx Black
- Wink of Stella
- Foam squares

Tuesday, April 24, 2018

Congratulations baby girl card

I'm here again with another baby card. This one is for my second godchild Lena, who was born last week.

baby girl card

For this card I used the Cuttlebug Welcome baby embossing folder to create a dotted background.
Then I stamped the onesie and the clothespins with Versamark and heat embossed it with white embossing powder.

baby girl card

Next I colored the stamped images with alcohol markers and die cut them.
For the sentiment I used Pure Graphite from Altenew and heat embossed this with clear sparkle glitter embossing powder.
Finally I added the twine and adhered the onesie and clothespins with foam tape onto the card.

baby girl card

Supplies
- Cuttlebug embossing folder Welcome baby
- Honey Bee - Hooray
- Clearly Besotted - Little onesie
- Versamark
- Altenew ink: Pure Graphite
- Wow embossing powder opaque bright white
- Wow embossing glitter clear sparkle
- Chameleon pen WG7
- Twin marker 7 Cosmos
- Twine

Tuesday, April 17, 2018

MtS Sketch 224

There hasn't been much cardmaking happening at my house lately because of the Easter holidays.
It's always frustrating to be itching to make new cards but not having the time.  I was fortunately able to have a quick play to create a card for MtS Sketch 224.


http://matchthesketch.blogspot.be/2018/04/mts-sketch-224.html


Marianne Design - Zebra

Marianne Design - Zebra

Supplies
- Design paper from Action
- Self-adhesive deco ribbon from Action
- Marianne Design - EC0170
- MFT - Pierced circle frames
- Chameleon markers: NG4 + CG8
- Foam tape
- Foam squares
- Memento teal zeal
- Memento tuxedo black
- Versafine onyx black

Friday, April 13, 2018

Storing blending foam pads for distress ink

I have seen a lot of ideas for storing sponge blenders on Pinterest lately and wanted to try it for myself since I have a blending pad for almost each color I have. I use them both for the mini distress inks and the oxide inks.
The idea came from a website but I don't know exactly which one because I didn't pin it but here you can see how it looks like.

Distress ink color chart

I first made a large size color chart for all the distress colors where there was enough space for the pad and the color name beneath it. 
Then I laminated these papers so I can easily clean it of when it's dirty.
Next I trimmed small pieces of self adhesive velcro and added one for each color. The only thing I had to do then was to put the blending foams.

You download the 3 pages here:

Page 1

Page 2

Page 3
Distress ink color chart

I also have a color chart that you can download from rangerink.com.
I just added some trimmed pieces of paper which I colored with the ink pads.
With this chart it's easy to see which color to use because the color on the ink pad is not really what it's looking like when you actually blend them out.
And it allows you to see all the different colors that you have in your collection.

Distress ink color chart

Distress ink color chart

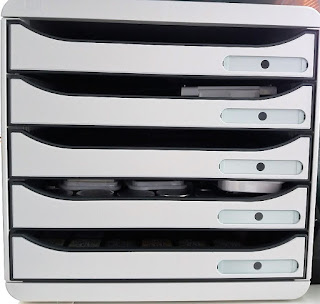
I store my mini distress ink pads in a drawer I have for many years and for me it works great.

Distress ink pads
Drawer for distress ink pads

So now you've seen how I store my mini distress ink pads and how I organize my blending foams. Thanks for stopping by!

Friday, April 6, 2018

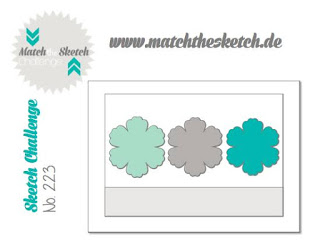
MtS Sketch 223

Today I'm back with my take on this week's MtS Sketch challenge.

http://matchthesketch.blogspot.be/2018/04/mts-sketch-223.html

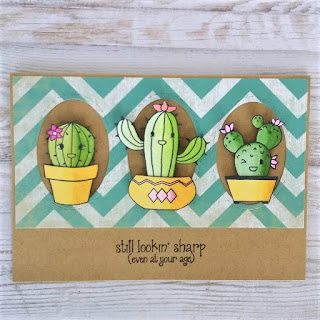
Last week I went to a workshop at Happy Hobby where I learned some coloring techniques with Chameleon alcohol markers. So for this challenge I wanted to
use a stamp set where I could practice a bit with these markers.
 
I used the Sticky Note stamp set from Pink and Main and colored them with both Chameleon and Twin markers. Then I cut them out by hand.


I used design paper from My Mind's Eye and die cut 3 ovals with a stitched oval die. Next I stamped the sentiment with Versafine Black ink.
Finally I used foam tape to adhere the cacti to the card to give them some dimension.


Supplies
- Pink and Main - Sticky Note
- Kraft paper
- Design paper from My Mind's Eye - Bramble rose
- Chameleon pens
- Twin markers
- Stitched oval die
- Memento Tuxedo black
- Versafine Black
- Foam tape