Wednesday, February 28, 2018

SU Birthday balloons pop up card

My little niece will be 2 years old next week so it's time for a new card. I used the Balloon adventures stamp set and dies from Stampin' Up  to make this one.

SU Balloon Adventures

I started stamping 3 balloons on a piece of white cardstock with cotton candy, mango smoothie and peach perfect from Altenew. Then I stamped the sentiment in Versafine black and mounted this front card onto a mint-colored cardstock.
 

I die cut 1 balloon and adhered it with foam tape in the middle to give it some dimension. To create a subtile sparkling effect I colored the other 2 balloons with a Wink of Stella clear brush. Sorry you can not see it clearly on the photo.


First I wanted to mount this onto a white card base but I thought it would be fun to stamp some balloons in the background of the card base to make it more interesting. So that's what I did with Volkano lake of Altenew.

Then I die cut the inside of the card from white cardstock. I decorated this with the Balloon Adventures stamps from Stampin' up and used the same colors as on the front card.


SU Balloon Adventures

Supplies
- Stampin' Up - Balloon Adventures stamp set + dies
- Altenew ink:
          - volcano lake
          - cotton candy
          - mango smoothie
          - peach perfect
- Versafine onyx black
- Wink of Stella clear brush

Monday, February 26, 2018

CFC #193

Today I'm sharing a clean and simple card for the CAS-ual Fridays Challenge - Sketch #193.
Here's the sketch for this week:

CFC193 sketch


Altenew Halftone circles

First I started die cutting the front card with a stitched rectangle die (9.5 x 13.5 cm)
Then I stamped the circles in mountain mist, volcano lake and lagoon to achieve an ombré effect. These are all inks from Altenew. I only used one circle stamp from the Halftone Circles stamp set of Altenew for this card.
I mounted this front piece on a piece of colored cardstock and adhered this to the card base.

Altenew Halftone circles

For the sentiment I used the Let's Bokeh stamp set from Lawn Fawn. I stamped this sentiment with Versamark on a piece of black cardstock and heat embossed it with white embossing powder.
Finally I used foam tape to adhere this to the card.

Altenew Halftone circles

Supplies:
- Altenew - Halftone Circles
- Altenew inks: 
          - mountain mist
          - volcano lake
          - lagoon
- Lawn Fawn - Let's Bokeh
- Versamark
- white emossing powder
- Crealies CLNestXXL24

Friday, February 23, 2018

Match the Sketch #217

I'm starting to enjoy sketch challenges so today I made a new card for Match the Sketch #217.

MtS #217 

MtS #217

I started with black cardstock as my card base and stamped the Framework background of MFT on a piece of kraft carstock with Versafine black ink.
Then I used a square stitched rectangle die to die cut the black and white squares.
For the circle, I used a piece of vellum to die cut with a stitched circle die.
 
MtS #217

The sentiment is embossed with the Word-Filled Stars embossing folder of Cuttlebug. I really love these small embossing folders with the tiny sentiments.

I wanted to create a bit more contrast for the sentiment so I added gold gilding wax on top of it. Instead I also could have used gold embossing powder.
Finally I cut out the embossed star and adhered everything onto the card.

MtS #217

Supplies:
- MFT - Framework background
- Versafine onyx black
- Cuttlebug embossing folder Word-Filled Stars
- Gilding wax old gold
- Square die and circle die

Thursday, February 22, 2018

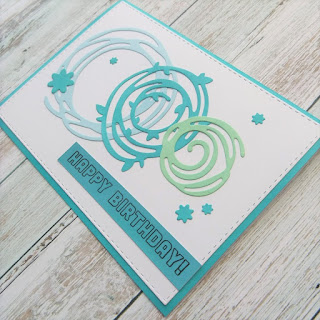
AAA Cards Challenge #109 - Die cuts only

I wanted to create a card but I ran out of ideas so I was checking Pinterest and found a challenge on http://aaacards.blogspot.be/

CAS Game #109

The rules for this challenge: 
We're looking for CAS cards that feature die cuts as their main and focal point. We will accept the addition of a stamped sentiment, but not stamped images that have been die cut. 

As always our definition of CAS means that white space should not be patterned, embossed or textured.

I never participated in a challenge but I thought it would be fun to make a die cut only card.
swirly scribbles

I started with a card base of 10 x 14 cm. I used a stitched rectangle die to 
die cut a piece of 9.5 x 13.5 cm and adhered it on top of the card base.

Then I created the swirly circles of the SU Swirly Scribbles Thinlits Dies and the small flowers of Marianne Design CR1323.

swirly scribbles

Finally I stamped the Happy birthday sentiment of SSS Birthday Messages with Versafine on a paper strip that matches the color of the card base.

swirly scribbles

Supplies:

Thursday, February 15, 2018

Cat in circles card

I'm an animal lover and especially a cat lover! Since I was a child I always have had cats and at this moment I own 3 of them, 1 European Shorthair, 1 Maine Coon and 1 looks like a Norwegian Forest cat.

cats in circles

So I decided to make a cat card since I recently bought the cat die set of Impression Obsession.
I wanted to use the Circle Sayings stamp set of SSS and I wanted the text stamped on seperate circles. First I checked my circle die cuts but they weren't the right size so instead I used my Silhouette Cameo to make the circles.
I then colored them with Altenew inks. The colors that I used are peach perfect, mango smoothie, cotton candy and grapevine. After coloring them I stamped the birthday sentiments on the circles with Versafine Onyx black.

cats in circle

For the card base I used blush from Altenew as a background color. Then I die cut the cats and colored them with dark chocolate from Altenew. After assembling the card I thought there was something missing in the bottom of the card so I made an extra circle for the word congrats with the Silhouette Cameo and colored it with grapevine from Altenew. I used foam squares to give this circle some dimension and added sequins as a finishing thouch.

cat in circles

Supplies:
- Altenew ink: peach perfect, mango smoothie, cotton candy, dark chocolate, blush and grapevine

- Impression Obsession cats die set
- SSS - Circle sayings
- Versafine onyx black
- Silhouette Cameo
- Foam squares
- Pink sequins

Friday, February 9, 2018

How it al started


Finally I started my own blog. Let me explain to you how I fell in love with papercrafts.

It all started a couple years ago when I was married for about 2 years and I still didn't have a wedding album.
I wanted to make it myself and started surfing on the internet to get some ideas. That's how I became addicted to Pinterest. I spent hours, days, weeks on Pinterest saving so many creations on my boards and that moment I discovered the possibilities of the Silhouette Cameo. What you could do with that machine was so amazing!
I saved some money and bought one myself so I could start creating titles, backgrounds, ... for my scrapbook. Finally after being married for 5 or 6 years our wedding album was finished!


The addiction continued by making personalized t-shirts for my daughter and I started making a scrapbook for her too with some baby pictures.
 

Now it's about 1 year that I also started making cards with stamps, stencils, embossing folders, ...
I really enjoy looking for inspiration on Pinterest and Youtube and be creative with papercrafts!